Transform Your Space With DIY Notice Board Ideas: Creative and Easy Projects for Home Organisation
9th Feb 2026
A DIY notice board is a simple, low-cost display solution that brings order and personality to kitchens, home offices and kids’ rooms. By combining basic components — a pin-friendly surface, a frame and a few accessories — you create a focused place for reminders, inspiration and everyday planning. This guide shows how to choose materials, build a fabric-covered cork board, reuse reclaimed items for upcycled notice boards and arrange multi-board setups to maximise function. You will learn specific materials and tool lists, step-by-step instructions for a stylish cork board, sustainable project ideas with sourcing tips, and practical accessory recommendations for family command centres and workspaces. Throughout, the emphasis is on achievable projects that use common craft tools, clear time and cost cues, and smart layout strategies to transform clutter into visible, useful displays.
What Materials Do You Need for Easy DIY Notice Board Projects?

A good DIY notice board begins with the right base materials and a few reliable tools that determine durability, finish and ease of installation. Choose a pin-friendly core such as a cork panel or foam-backed pinboard, select a surface (fabric or paint) for aesthetics, and pick frame or mounting hardware that suits your wall and use-case. Attention to material attributes — cost, durability and sustainability — speeds decision-making and prevents rework when you personalise the board. The short lists below name essential supplies and tools, followed by a compact comparison table to help you weigh options and pick the right base for your project.
Essential materials for most notice board projects include:
- Cork panels cut to size provide a pin-friendly surface that is lightweight and easy to mount.
- Fabric and wadding (batting) give a soft, finished look and hide seams while allowing pins to hold securely.
- Frame moulding or recycled frames complete the edges and make the board wall-ready.
Summary: Choosing a base material shapes the project’s longevity and look; cork panels are beginner-friendly, fabric adds polish, and reclaimed mouldings boost sustainability while keeping costs low.
Which Types of Notice Boards Are Best for DIY Projects?
Cork notice boards, fabric-covered cork, magnetic panels and chicken-wire display boards are common hyponyms of the broader category of notice boards; each type offers distinct benefits. Cork notice boards are classic: they accept tacks easily and require minimal finishing, making them ideal for quick projects. Fabric-covered cork boards add texture and colour while maintaining pin functionality, suited to decorative bedrooms and creative studios. Magnetic boards and glass/poly surfaces provide writable or magnet-friendly displays for kitchens and offices where reusable notes are preferred.
For beginners, cork or pre-cut pinboard panels are the most forgiving; more advanced makers may choose combined surfaces such as magnetic-backed cork or framed glass for a sleeker finish. Understanding these types helps you pick the best match for your room’s needs and skill level.
What Essential Tools Help Create Homemade Notice Boards?
A compact tool kit simplifies construction and improves the finish of your DIY notice board projects while keeping costs manageable. Essential tools include a staple gun for attaching fabric, a craft knife for accurate trimming, a spirit level for straight mounting, and mounting hardware appropriate to wall type. Optional items such as a mitre box for clean frame corners, spray adhesive for even bonding, and a rotary cutter speed production and yield neater edges.
Safety tips: always cut away from your body, use clamps when gluing or stapling, and protect work surfaces to avoid damage. Choosing a few multipurpose tools balances cost and capability for future display projects.
|
Base Material |
Durability |
Cost |
Ease of Use |
|---|---|---|---|
|
Cork panel |
High for indoor use |
Low–Medium |
Very easy to cut and mount |
|
Fabric + wadding over cork |
Medium |
Low–Medium |
Moderate; needs stapling |
|
Magnetic sheet over board |
Medium–High |
Medium |
Requires adhesive and accurate bonding |
This comparison highlights that cork panels deliver strong value for most home projects, while magnetic or fabric finishes add functionality or aesthetics depending on your priorities.
How Can You Make a Simple and Stylish DIY Cork Board?
A fabric-covered cork board combines practical pinability with a stylish surface that coordinates with your decor; the process is straightforward and yields a professional look. Begin with a pre-cut cork panel or pinboard, layer wadding (batting) for depth, wrap your chosen fabric tightly and secure it to the back with a staple gun, then add frame moulding or a simple wooden surround. This mechanism of layering (cork → wadding → fabric) preserves pin function while delivering an attractive finish that fits bedroom, kitchen or hallway uses.
Follow these numbered steps for a quick build:
- Measure your wall space and cut the cork panel slightly smaller than the frame opening.
- Glue batting to the cork, centre the fabric over it and staple neatly to the reverse.
- Fit the frame moulding or secure a pre-made frame, then attach D-rings or cleats for hanging.
Summary: This method takes roughly 45–90 minutes depending on size and yields a durable, custom board suitable for notes, photos and calendars; using pre-cut cork panels speeds the process and reduces mess.
What Are the Steps to Create a Fabric-Covered Cork Notice Board?
Creating a fabric-covered cork notice board follows a clear sequence that balances speed and finish quality; the key steps are measurement, layering and neat fastening. Measure twice and cut once: ensure the cork panel fits your intended frame or wall area, then attach a thin layer of wadding to give the board a gentle surface for pins. Centre your fabric over the layered panel, pull it taut and staple at consistent intervals to avoid puckering, trimming excess fabric at the corners before finalising. Mount the finished panel in a frame or attach hanging hardware and test with several pins to confirm pin retention and overall stability.
This repeatable process makes it easy to scale boards to different sizes and styles, and choosing pre-cut cork or panel-ready bases reduces prep time for beginners.
How Do You Decorate and Personalise Your Cork Board?
Personalisation transforms a plain cork board into a curated focal point that reflects your style and organisation needs; decoration options are wide and often low-cost. Consider using ribbons to create grid sections, washi tape to mark priority zones, small hooks or clips for keys and lightweight items, and framed photo corners to highlight images. For a sustainable touch, repurpose fabric scraps, old buttons or vintage trims to add texture and character; these upcycling elements deliver visual interest while reducing waste.
Finishing tips: pick a cohesive colour palette, balance functional zones (calendar, reminders, inspiration) and leave negative space so the board doesn’t feel cluttered; these choices sharpen both aesthetics and usability.
What Are Creative Upcycled Notice Board Ideas for Sustainable Home Organisation?
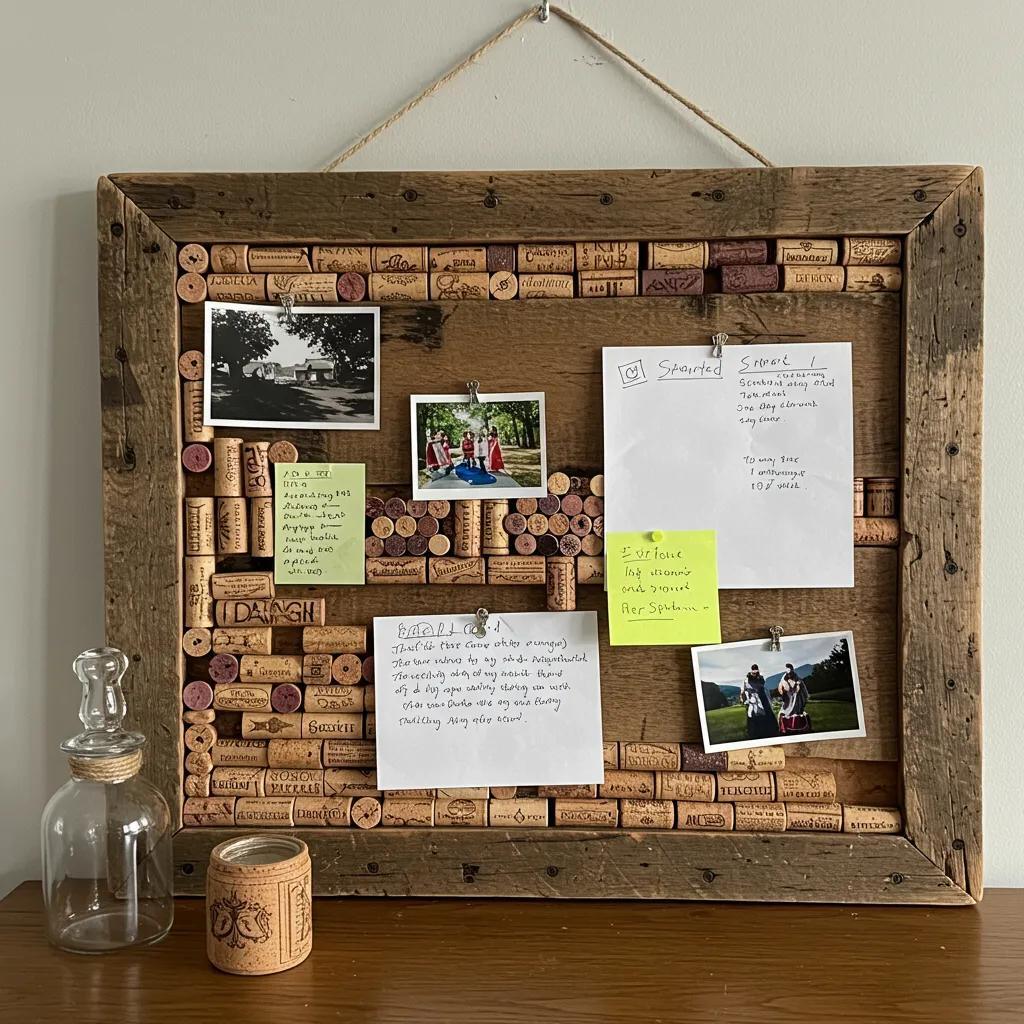
Upcycled notice boards repurpose common household items into unique display panels that reduce waste while creating one-off designs for rustic, vintage or industrial interiors. Reclaimed frame-and-cork assemblies, wine cork mosaics, pallet wood with chicken wire, and fabric-scrap patchwork mounted on lightweight board all convert cast-off materials into functional displays. Sustainability is achieved by prioritising reclaimed wood or straps, choosing natural or recycled fabric scraps, and sealing reclaimed surfaces for indoor longevity and safety.
A brief list of recycled-material project starters:
- Wine cork bulletin mosaic mounted in an old picture frame creates a textured pinboard.
- Reclaimed wood plank with attached chicken wire makes a rustic memo and clipping board.
- Scraps of fabric stretched over recycled fibreboard give a colourful, patchwork notice board.
Summary: Upcycled projects combine character with low cost; cleaning and sealing reclaimed items ensures they’re hygienic and durable for everyday use.
How Can You Use Recycled Materials for Unique Notice Boards?
Reclaimed components such as old picture frames, salvaged timber and leftover fabric can be repurposed into distinct notice boards with minimal tools and cost. For example, glue wine corks into a frame to form a dense, pin-ready surface, or attach chicken wire across a wooden frame to clip photos and notes with small pegs. When working with reclaimed wood, sand and seal surfaces to remove splinters and clean contaminants; for fabric scraps, iron and layer them over a stable backing for longevity. These simple transformations turn waste into useful household organisation tools while adding story-rich textures to your interiors.
These approaches support sustainability goals and produce boards that are visually rich and highly customisable.
What Design Styles Suit Upcycled and Vintage Notice Boards?
Upcycled notice boards pair naturally with rustic, vintage and shabby-chic interiors where texture and patina are celebrated; matching the board’s finishes to room elements reinforces cohesion. Rustic styles favour raw timber, visible joinery and metal fixings, while vintage or shabby-chic looks use distressed frames, muted fabrics and antique-style pins. Industrial schemes benefit from metal grids and clipped displays mounted on reclaimed factory wood, and minimalist settings call for monochrome fabric and thin-profile frames to keep visual noise low.
Styling tip: choose a dominant material (wood, metal or textile) and echo its texture in surrounding decor to make the board look deliberately designed rather than improvised.
How Do You Maximise Functionality With DIY Memo and Pin Boards?
To make notice boards genuinely useful, map board features to specific use-cases and outfit each board with accessories that match the intended function. Boards can be organised into zones (calendar, incoming mail, urgent tasks) and fitted with practical add-ons such as magnetic strips, pockets and labelled clips to store small items. Assess functional attributes — magnetic, writable, lockable or pin-friendly — and pick combinations that address the needs of a kitchen command centre, a home office project board or a children’s homework station.
Below is a compact mapping of board types to best uses:
|
Board Type |
Best Use |
Notes |
|---|---|---|
|
Magnetic board |
Kitchen lists, office memos |
Allows reusable notes and magnets |
|
Lockable board |
Secure notices in shared spaces |
Protects sensitive documents |
|
Cork pinboard |
General household use |
Best for layered pinning and photos |
This table clarifies that matching board features to room roles streamlines organisation and reduces clutter by placing the right functionality where it’s needed most.
What Are the Best Notice Board Uses for Home and Office Organisation?
Notice boards serve varied roles: a family command centre consolidates schedules and keys, a home office board organises projects and deadlines, and a kid’s study board keeps assignments visible and motivates routines. For each template, combine an appropriate board type with accessories: magnetic strips and whiteboard sections for offices, pockets and hooks for entryways, and colourful labelled zones for children. Layout templates typically use a left-to-right flow for incoming → in-progress → completed items, which mirrors task management logic and improves throughput.
Mapping these templates to specific boards ensures the right surface and accessories are chosen for maximum daily utility.
How Can Accessories Enhance Your DIY Notice Board’s Function and Style?
Accessories convert a basic board into a multi-functional hub: magnets and magnetic strips let you swap notes without pins; clear pockets store coupons or receipts; ribbon grids create tidy zones for photos and tickets. Installation is straightforward: adhesive-backed pockets and peel-and-stick magnetic strips work for renters, while small screws and D-rings suit permanent mounts. Pair accessories intentionally — use labelled clips for bills and magnets for menus — to keep the board organised and visually coherent.
For projects needing ready-made bases or specialist panels such as cork boards, pinboards, lockable notice boards or glass/poly notice boards, consider sourcing quality panels and accessories from a specialist display supplier to save preparation time and ensure consistent finishes. Retail Display Direct specialises in display solutions and offers these notice board categories as useful starting points for DIY projects.
|
Board Feature |
Attribute |
Best Use Case |
|---|---|---|
|
Magnetic surface |
Reusable |
Kitchen lists, office memos |
|
Lockable panel |
Secure |
Shared spaces with sensitive notices |
|
Glass/poly writable |
Writable & sleek |
Modern offices, writable calendars |
How Can Accessories Enhance Your DIY Notice Board’s Function and Style?
Accessories such as hooks, clips and pockets adapt a single board into a multifunctional centre; choosing the right combination simplifies routines and elevates appearance. Small baskets or pockets hold markers and receipts, labelled clips segment tasks, and magnetic tins store pushpins; mixing textures (metal clips, fabric pockets) creates a layered, intentional look. Install accessories based on frequency of use—place daily items within easy reach and archival items in a tucked pocket—to maintain both style and practicality.
If you prefer to start with a high-quality cork or pinboard panel rather than preparing raw materials, purchasing a ready-made cork board or pinboard panel from a specialist supplier reduces prep time and ensures neat, consistent sizes and finishes; this approach is especially useful for larger or lockable boards.